
Using This Site
Really quick version:
- Select a pickup to see its wiring hook-up colours.
- Select a second pickup to see how its colours compare to the first.
A little more detail
Pickup manufacturers stubbornly refuse to give any ground towards standardising their wire colours. This means that when you want to swap out a Gibson pickup for a Seymour Duncan, you can't assume you just connect the little red wire to the same place it used to be.
I've made this site to try help out. This site helps you compare the wire colours of one pickup to another to see how the correspond. So, when you're upgrading your humbucker, you have a little map of what wire goes where.
It's easy… You choose your existing pickup from the list in Pickup A and your new pickup from Pickup B.
Then, you'll see a diagram of each with the differently coloured wires neatly lined up for comparison.
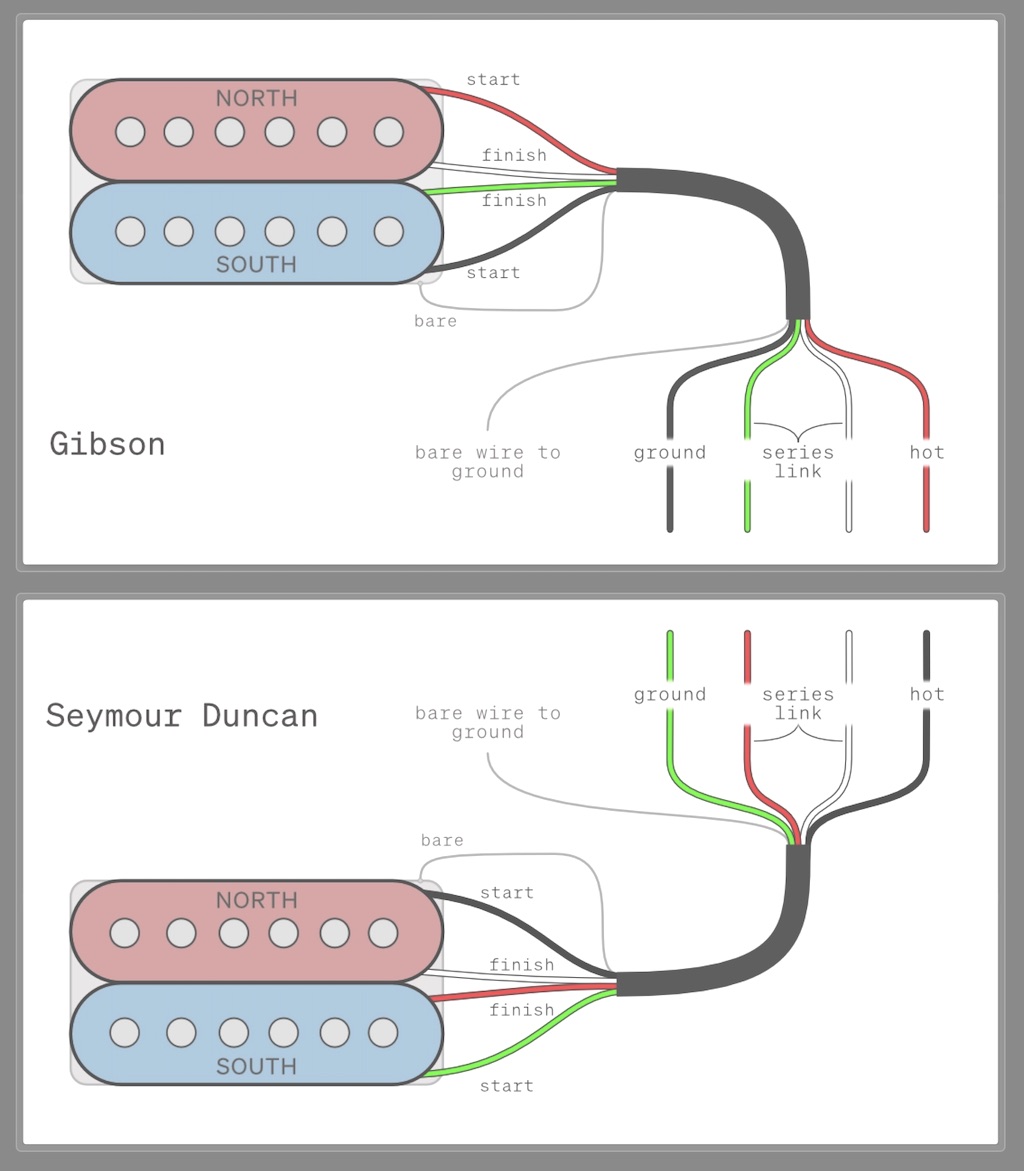
For instance, if you've picked a Gibson and a Seymour Duncan, you can see that the red wire on the Gibson corresponds to the black wire on the Duncan. So, when swapping the pickups, you'll connect the black wire of your new Duncan to the place where the red wire of your Gibson used to be. Same with the other wires.
A couple of things to note:
- The bare wire always goes to ground.
- I’ve noted north and south coil info and coil start/finish assignments where I could. You'll almost never need to know this but it could be handy for advanced troubleshooting.
- What’s shown are the default wire assignments. Particular guitars and circuits may alter these to achieve different aims. As a simple example, hot and ground wires can be flipped to reverse the phase of the pickup. Most of the time, though, these will work fine.
- Where I've been able, I’ve tried to verify this information with the pickup makers or with their websites. This means that a few of these diagrams differ from other info available online. I’ve decided to trust the manufacturer’s information where differences occurred.
- There are a couple of diagrams with an asterisk * on the title. These have a question mark over their accuracy. They’re probably fine but I’ve been unable to absolutely confirm them.
- One last, important, thing to mention. Seeing the two diagrams laid out, one on top of the other like this, might make you think one is a neck and one a bridge pickup. That’s not the case. This is simply referencing one pickup against another pickup to see how their wiring compares. It's intended to make it easier to perform a straight swap of one pickup for another in the same position.
You'll find a little more techie information in Wiring Info.
You should read the terms of use for disclaimer information.
Mistakes
If there are mistakes, I'm sorry. I've physically tested some of these but there are far too many to encounter them all. Mistakes might be because the information I've been able to find was incorrect but may be because I did the diagrammatical equivalent of a typo. All of this info is presented 'as-is', without warranty (see more) but I'll be happy to fix any mistakes if you email me at gerry@hazeguitars.com.

If this site has saved you some hassle, it'd be cool if you could buy me a coffee.